This morning I solved the internet connection problem for my computer. I drilled two holes in my floor. One near the router and one near the computer. Then I strung an Ethernet cable across my basement ceiling. It took a while to figure out where to plug it in on the computer. Then the challenge was to learn how to change the computer settings to a local area network. Now that I've done it I understand the logic of what I needed to do. But when I was problem solving all of this it was a daunting task. I'm looking forward to getting back to blogging.
Today I'm purchasing a tabletop drill press and tomorrow I'm setting it up at the Lillian Street studio! I'm really looking forward to that!
Showing posts with label studio. Show all posts
Showing posts with label studio. Show all posts
Saturday, October 22, 2011


Monday, July 4, 2011
A Day at Lillian St. Studio
The studio is almost ready for the machinery to be moved in. While Elaine Fuller and I were off having fun at summer camp Beth Rogers was pushing progress at the studio. She built a vertical lumber rack that immediately got filled in a with lumber to recycle into shop improvements and projects. It won't take much to get it sorted out so that fresh lumber can be stored there also.
 She built a wheeled cart for the chop saw. A nice feature of this cart is the lumber supports on either side of the saw. This makes it easier for one person to cut long pieces of wood.
 One of the things I did today was start a couple foot stools made of recycled lumber. I took them home to make some patchwork upholstery tops. One will end up in my home and the other will be in the upstairs lounge at the studio.
 Beth realized that we needed a mirror the other day when she got some saw dust in her eye. She hung a beveled mirror in the lounge.
We installed an air conditioner and it made an enormous difference in the temperature. It doesn't look like much but it's got it where it counts.
 Meanwhile, down in the kitchen area Elaine Fuller was painting. The bench and table are almost ready for use. I will celebrate the first time we eat on the table. We couldn't today because the paint on the bench was still wet.
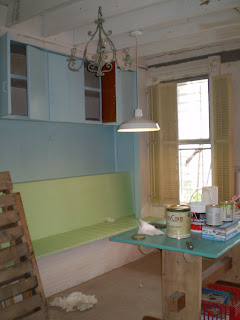 The cabinet that was hidden behind a wall has been repaired and painted. It looks fabulous! The microwave is in place. Soon we will set up a mini fridge in the lower left.
 The wall to the left has turned into Elaine's patchwork quilt in drywall scraps and paint. I'm curious to see how she will detail it.
 I am so happy to have this studio! I want to spend a lot of time working in it. The couch will be my first serious project.


 |
| Beth Rogers lounging in the lounge. |


Wednesday, June 15, 2011
Plans to Build a Couch
Electronic devices are great. When they work! My computer problems may or may not be solved. Its working now so its time to post.
Recently my son moved to his own place. I am taking the opportunity to reorganize and redo parts of my house. The living room currently has two arm chairs and a love seat. There is nowhere to lie down. The Lillian Street studio has progressed to the point where we can work in it. Therefore it is time to build a couch. I built one once before in the late seventies. I saw it recently and it is solid and I like the design. I'll try to get a photo to post.
I have a number of requirements for my couch. It needs to be cat resistant. That means that it will have a wood frame. Here is my initial sketch for the project. The arms will be wide and there will be shelves under them. The cushions will not be attached to the frame so that I can recover them. Because I am also concerned about aging in place the couch will be somewhat firm and the seat height will not be low. I'm currently thinking about making 6" upholstery foam cushions that will rest on a plywood base.
 I have no experience with sewing upholstery fabric but think I can figure out how to do it. The old Bernina sewing machine that I inherited from my sister is made of steel and brass. It can handle upholstery fabrics. I like the way the folks at Squint patchwork the upholstery on their furniture. So I have to learn how to do that. I bought some remnants from the OnlineFabricStore and am doing some small projects to build up my skills. Here is my first cushion. The cushions on the couch will have buttons!

Because I am planning to build the couch's wood frame for paint I am also doing some warm up exercises with painting small furniture. This table was painted with artists acrylic paint. I am concerned that it will be sticky in warm weather. Latex paint may be a better choice. I'll see how the surface of the table holds up.

 Obviously these two items don't coordinate. In the near future I need to decide on a color scheme and sense of pattern. Like a crazy quilt the couch will have areas that are visually active and areas that are quiet. I'm excited. It will be a fun project.
Recently my son moved to his own place. I am taking the opportunity to reorganize and redo parts of my house. The living room currently has two arm chairs and a love seat. There is nowhere to lie down. The Lillian Street studio has progressed to the point where we can work in it. Therefore it is time to build a couch. I built one once before in the late seventies. I saw it recently and it is solid and I like the design. I'll try to get a photo to post.
I have a number of requirements for my couch. It needs to be cat resistant. That means that it will have a wood frame. Here is my initial sketch for the project. The arms will be wide and there will be shelves under them. The cushions will not be attached to the frame so that I can recover them. Because I am also concerned about aging in place the couch will be somewhat firm and the seat height will not be low. I'm currently thinking about making 6" upholstery foam cushions that will rest on a plywood base.

Because I am planning to build the couch's wood frame for paint I am also doing some warm up exercises with painting small furniture. This table was painted with artists acrylic paint. I am concerned that it will be sticky in warm weather. Latex paint may be a better choice. I'll see how the surface of the table holds up.


Thursday, June 2, 2011
Studio Construction Update
Computer problems have prevented me from posting. A computer smart friend got my computer working last night and by morning the problems had returned. So today I'm posting from my work computer. Hopefully the nasty virus and the space hogging extraneous programs can be banished so I won't throw the computer in the river (just kidding). Work on my Etsy shop has also been impacted. I'm making lots of buttons but haven't gotten them into the store. One way or the other these problems will get resolved.
 Work on the Lillian Street Studio is progressing nicely. On the main level tools are getting set up. Beth Rogers and Rip Phipps are discussing the intricacies of the radial arm saw in the photo above.
 Elaine Fuller is standing on one of the sturdy work benches we built to paint the drywall.

One of the two skylights is installed and it is NOT leaking. This is very good!
 The upper loft is ready for paint.
I'm excited about the progress on the studio. The first project that I am going to make is a new couch for my living room. I'm inspired by the folks at Squint.


One of the two skylights is installed and it is NOT leaking. This is very good!

I'm excited about the progress on the studio. The first project that I am going to make is a new couch for my living room. I'm inspired by the folks at Squint.
Saturday, April 23, 2011
Lillian St. Studio Construction Update
Beth Rogers has been busy making great progress with the Lillian Street woodworking studio. The third floor rest and drawing loft is developing personality and a better connection to the second floor. It has a very nice quality of light because of the windows and skylight.
In the after photo the knee wall has been removed along with the flooring beyond. A second skylight is planned for the section of roof beyond the knee wall. This will allow light and air to circulate between the floors. In the photo below you are looking up to the open floor beyond the knee wall in the loft.
This photo may not look like much but it is an important one. There is now a rational and safe installation of wiring for lights, equipment and heating. It is so nice to not be tripping over extension cords. The building inspector has signed off on the work.
Down in the lowest level the plumbing is fully functional. Beth built a counter around the sink. Hot water is generated as needed by an energy saving heater. This is the only room that is heated when no one is working in the studio. This room is also where we will store paint, glue and anything else that shouldn't freeze.
 |
| Before photo of the loft. |
 |
| After photo. |
 | ||
| The green bead and board wall extends into the loft and is the hand rail on the stairs. |
 |
| We have electricity and heat!!! |
 |
| Running hot and cold water. |
Monday, March 28, 2011
Studio Construction
This sequence of photos shows the construction of the studio kitchenette. The first photo is the most current. This sequence of photos moves backwards through time to the "before" photo. Think of it as a blog post time machine. The work in these photos took place over several weeks.
All the kitchenette needs now is a little more paint and the services of an electrician. The microwave, refrigerator and electric kettle are ready to set up when we have power. The water source is in the next room which is the only room that has heat in the winter. Frozen water pipes are not part of the plan! The hot water heater heats water on demand and does not keep a big tank of water hot at all times. This is a great energy saving device.
Beth Rogers and I built this structure. Elaine Fuller applied the water vapor barrier to the foundation and painted it all.
All the kitchenette needs now is a little more paint and the services of an electrician. The microwave, refrigerator and electric kettle are ready to set up when we have power. The water source is in the next room which is the only room that has heat in the winter. Frozen water pipes are not part of the plan! The hot water heater heats water on demand and does not keep a big tank of water hot at all times. This is a great energy saving device.
Beth Rogers and I built this structure. Elaine Fuller applied the water vapor barrier to the foundation and painted it all.
 | |
| The unpainted wood on the face of the structure is a recycled 2x4 from the interior walls that we removed. This photo is by Beth Rogers, all the others are mine. |
 |
| The back and floor were painted before the counter and shelves were added so that the work could be done with good ergonomics. We are all women over the age of fifty so we have to do everything carefully. |
 |
| Plywood walls are partially completed and the framework for the counter is in place. Notice the mortises in the recycled front rail. This is a beautiful piece of rough cut lumber with carefully cut mortises. I'm glad we found a place to showcase this bit of the building's construction history. |
 |
| The vapor barrier is applied and the framing is in place. |
 |
| This is the before photo of the raw foundation under the stairs. |
Friday, March 11, 2011
Studio Construction
Now that winter is not bitter cold, it is possible to work on turning a small house on Lillian Way into a studio. Beth Rogers, Elaine Fuller and I have been working on getting a room on the lower level functional. The purpose of this room is to have a place to sit at a table to eat or draw and to have a room with less dust where we can paint or finish wood. In these photos you can see the construction sequence of a built in bench that will be part of a half booth & table.
While seated on the bench you can see the stairs up to the main level of the studio.

 |
| Before shot! Plastic vapor barrier covers the foundation of the house. |
 |
| The bench is framed in and the foundation is covered with insulation. |
 |
| The seat is made from recycled beaded tongue and groove wainscot. |
 |
| The bench is finished and ready for a coat of primer. |
 |
| Edited March 20, 2011 to show bench with primer paint. Elaine Fuller was the painter. |
While seated on the bench you can see the stairs up to the main level of the studio.

Tuesday, January 11, 2011
Lillian St Studio - Posts and Beam
Its been cold lately so progress on the interior renovation has slowed. But Beth Rogers and I have been working on making brackets to provide triangulation and strength to the post and beam system that is replacing the interior walls. We decided to each do our own thing and have fun making the brackets.
 Beth chose to make an Asian inspired bird. It looks great and it provides stability in two planes. A tail for the bird is in the works.
 For my bracket I played with the Victorian impulse but threw out the rules. It will have cut out shapes added onto the left side and be painted in several bright colors.
 This is a photo of me working on my bracket. It was a fun day despite the chilly weather. Beth Rogers took all of these photos.


Wednesday, December 29, 2010
Lillian St Studio Update
The structure has been buttoned up for winter and the facade looks great. It's a tiny house in the urban hills of Pittsburgh that is going to be a fun studio. Notice the building permit.

The interior is a construction project. Walls have been removed and replaced with a laminated beam.

The push right now is to get everything ready for the electrician to do the wiring. After that it can be insulated and dry walled. Tuesday was a workday for Beth Rogers and myself. Our task was to deal with holes in the floor.

The holes are in the area of a former bathroom. It was a cold day, with temperatures in the 20s, but with a couple Envi Heaters and vigorous work we were warm enough to work an entire day. Patching the floor was time consuming because we had to attach wood to all the beams so that our patches didn't fall through to the lower level.

We got the job done and the floor is solid. It was a great work out. This is my favorite form of exercise! I have visions of playing with a band saw and drill press by next summer.
Beth is in her 50"s and I turned 60 this past summer. Part of the fun of this project is demonstrating that older women can handle projects like this one. As an occupational therapist (my day job) I can report that an important element of how we work is the application of the principles of energy conservation and good body mechanics/ergonomics.

The interior is a construction project. Walls have been removed and replaced with a laminated beam.

The push right now is to get everything ready for the electrician to do the wiring. After that it can be insulated and dry walled. Tuesday was a workday for Beth Rogers and myself. Our task was to deal with holes in the floor.

The holes are in the area of a former bathroom. It was a cold day, with temperatures in the 20s, but with a couple Envi Heaters and vigorous work we were warm enough to work an entire day. Patching the floor was time consuming because we had to attach wood to all the beams so that our patches didn't fall through to the lower level.
We got the job done and the floor is solid. It was a great work out. This is my favorite form of exercise! I have visions of playing with a band saw and drill press by next summer.
Beth is in her 50"s and I turned 60 this past summer. Part of the fun of this project is demonstrating that older women can handle projects like this one. As an occupational therapist (my day job) I can report that an important element of how we work is the application of the principles of energy conservation and good body mechanics/ergonomics.
Tuesday, April 21, 2009
studio photos
 A pin cushion doll
 Baby Matron in repose
 Monkeys and pigs
 epb doll minding the time
 My rocking chair
Subscribe to:
Posts (Atom)